Adding molding or inserts can transform plain cabinet doors into an eye-catching focal point. You can also add a new door with clear, frosted, or seeded glass. A local glass shop can help you choose the best option for your cabinet door or drawer fronts. You can also sand down existing cabinet doors and stain them a lighter color for a fresh look. Just make sure to use low-VOC paints for your kitchen cabinets.
Corkboard
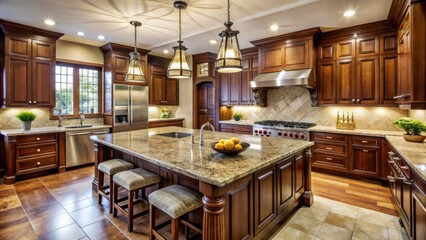
Cabinet Refinishing San Jose CA is a great way to update your kitchen on a budget. It’s also a great way to recycle old cabinet doors and drawer fronts that would otherwise end up in landfills. It’s important to take the time to clean your cabinet boxes thoroughly before refacing them, so you can get a smooth surface for applying your chosen refinishing materials. Then, you’ll need to sand the surfaces and paint them with an oil-based primer. This will ensure that your new finishes will stick to the cabinets.
One of the most popular DIY cabinet refacing ideas involves using corkboard to transform your cabinet door panels into an art display for your family’s memories and reminders. You can paint the corkboard in bright colors to add personality and contrast to your kitchen. You can also use corkboard to display children’s drawings or recipes. Corkboard is available in various sizes, so you can fit it to your door panel. You can even add a piece of cork contact paper to the bottom of a cabinet door for an additional decorative element.
Another creative cabinet refinishing idea is to add an embossed tin panel to your cabinet door frame. This design will make your cabinets look elegant and will give them a unique look that will match the rest of your home’s decor. You can paint the tin panel in your favorite color to achieve the perfect look.
If you’re looking for a more rustic look, try painting your cabinets with a dry brush technique. This technique will create a natural, aged appearance. You can even apply sandpaper to the cabinet doors to reveal the underlying colors in high-use areas and use dark paint splatters to mimic natural wear.
For a more sophisticated look, you can add wood slats to your cabinet doors. This will give them a picture frame effect and will make your kitchen more organized. This is a great option for those with open shelving. You can also attach wooden slats to the wall instead of installing them as a backsplash.
If you don’t have the space to install a window seat, you can still enjoy its benefits by making a bench out of your stock cabinets and adding a cushion. This is a perfect solution for small kitchens. This bench is also a great place to store cookbooks and other kitchen supplies.
Embossed tin panel
Embossed tin panels are still in demand even 70 years after tin’s heyday ended, and they are available in a wide range of historic patterns. Unlike the pressed tin of the past, today’s panels are made from 30-gauge tin-plated steel that is a mere 1/100 inch thick. They are also easier to install. They can be brad nailed into plywood without the need for the wood furring strips that tin was nailed into in the past. They are available in a wide array of factory finishes and colors, and they can be used for ceilings, wainscoting, cabinet-door recesses, fireplace surrounds, and mirror frames.
You can reface your cabinets to give them a fresh look with little cost. The first step is to remove the cabinet doors and drawer fronts and carefully clean the surfaces. If the surface is particularly grimy, you may want to consider a light sanding. Once the surfaces are clean, make a note of their location and any hardware that remains attached. This will save you time and frustration later when it comes time to reinstall the doors and drawer fronts.
If your cabinet boxes are in good shape, you can reface them with a simple DIY kit that costs about $100-$250. The kit contains essential materials like veneer sheets, edge banding tape, application tools, and sandpaper. You can purchase these kits online, but be sure to read the manufacturer’s instructions before starting. It is important to properly prepare the surface before applying the veneer, including removing any grease and dust.
Once the surface is dry, apply a wood stain to the exposed surfaces of your cabinet boxes. Be sure to use a stain that matches the color of your cabinets. This will help create a seamless appearance. Be sure to wipe the surface often to keep it moist and blend the effect.
For a quick and inexpensive kitchen update, you can add embossed tin panel to your door frames. This is a great idea for those who love a rustic theme, and it can be easily adapted to any style.
Tiles
While professional cabinet refacing is often expensive, DIY cabinets are a budget-friendly option. However, you should consider your skill level and time commitment when deciding whether to undertake the task yourself. Depending on your project, you may need to spend several days or weeks working on it. It’s also important to take into account the color and texture of your existing kitchen, as well as any potential problems with staining or matching.
One way to refresh cabinetry without refacing them is by painting the backs of the cabinets. The Merrythought refreshed the dated wood cabinets in her rental apartment with a $55 coat of olive green paint that instantly transformed the room. Another creative and functional idea is to decorate cabinet doors with chalkboard paint. This allows you to write grocery lists, reminders and creative doodles.
To create an aged look on plain cabinet doors, use a dry brush technique with caramel-colored paint. Then lightly sand the surface of the painted surfaces to reveal underlying layers and create natural-looking wear and tear. You can also add dark paint splatters and chains for a more distressed effect.
Wooden slats
Cabinet refacing offers an opportunity to refresh your kitchen without spending a fortune. You can update the look of your cabinets with paint, add trim and doors, or even swap out existing wood doors for glass-front ones. The options are endless, and you can find a DIY solution to fit your space and budget. But before you tackle a refacing project, consider your skill level and the amount of time you’re willing to invest. If you aren’t confident in your abilities or don’t have the time to commit to this type of project, you may want to hire a professional.
Thermofoil is a durable, moisture-resistant surface that’s not as fragile as laminate or veneer. It’s available in a variety of finishes and can be bonded to most cabinet frames. It also comes in a wide variety of patterns and colors. However, the process can be challenging for DIYers who don’t have the right tools or technique. A heat gun or iron, a J-roller, and a trim router are essential for this project. You’ll also need a special spray adhesive, which is typically applied with a brush.
To get started, you’ll need to remove all the cabinet and drawer fronts. Be sure to label each door and drawer so you can reattach them properly when the job is done. Then, you’ll need to prepare the workspace and apply a clean, dust-free surface. Once the cabinets are dry, apply a light coat of your chosen base color. After the coat dries, wipe most of it off with a cloth until you get the desired effect. Then, apply the lighter shade to highlight detail areas and corners.
You can further add to your cabinets’ style by applying a dark glaze or sanding the surface to reveal underlying colors. For a rustic touch, you can also paint splatters and dings to mimic natural wear and tear. This technique is ideal for renters who can’t replace their cabinets, but can give them a refreshed look with a little creativity. You can also create a focal point on your kitchen walls by adding lighting or removing the cabinet doors altogether to turn them into a display area for everyday dishware.